 |  | |
 |  |
OEM is an abbreviation for “Original Equipment Manufacturer.” REMANUFACTURED toner cartridges refer to cartridges produced from recycled empty toner cartridges after disassembling, inspecting, cleaning, reassembling, refilling and quality assurance testing to ensure optimal performance. OEM is an abbreviation for “Original Equipment Manufacturer.” REA typical production process includes inspection and replacement of key components as needed such as the OPC (Organic Photo Conductor) Drum, wiper blade, PCR (Primary Charge Roller) and magnetic roller. One of the most critical parts of a cartridge is the OPC Drum. New aftermarket drums are made specifically for remanufacturers to have a harder and more durable surface than the OEM cartridge. We only use new drums in our cartridges. There should be no difference in print quality or page yield with a properly remanufactured cartridge. Our cartridges contain quality toners that work well with the components and other replacement parts to meet or exceed OEM performance. Have you ever had a cartridge only lasted ....a day, a week or a lot shorter than normal? The question is often asked: how much ink is in the cartridge or how many pages can I expect to print? The first question is: what is the OEM stated page yield? The industry standard for ink cartridges is ISO/IEC 24711; this consists of a suit of 5 pages which is a mix of text and graphics and a mix of black and colour. These 5 pages are run continuously until the quality of the prints start fading. Now these 5 pages might or might not reflect what you print on a day to day basis. The actual yield that you will achieve is dependent on what you print: If yourpage is jam packed with text, graphics, wide borders or bold text you will be consuming a lot of ink and will not get the stated page yield. With inkjet; the printers are designed to “clean” the print head periodically, so if you do not use the printer every day and it stands idol or switched off, when you start up again it will go through a cleaning cycle which consumes ink. When you install a new cartridge it is always advisable to do an “alignment” page if you want good quality prints. This again will use ink so don’t forget to consider this when calculating your yield. Printing of photos consumes huge amounts of ink. If you print a few photos your yield will be considerably reduced. The colour cartridge consists of 3 primary colours so when printing in colour the three colours mix to create the desired colour (composite). In addition to that if you are printing predominantly (yellow, for example) the yellow will run out before the other colours which will give the wrong colour mix. This again will reduce the yield. More information on ISO /IEC printing standards are available at www.iso.org/jtc1/sc28
There is an option to “PROTECT” your cartridge so that your cartridge will only work in YOUR PRINTER. This applies to newer HP printers only. This means that your cartridge will not be able to be remanufactured in the future and will have to be disposed of. You will not be able to sell the empty as it will have no value. WHAT TO DO: Left Click icon of your printer Left click MAINTAIN YOUR PRINTER Left click HP CARTRIDGE PROTECTION Click on DISABLE HP CARTRIDGE PROTECTION (on top banner) Click on SAVE SETTING This will allow your cartridge to be used in other printers. Below is an example of the screen that will appear on your computer. This feature allows a printer owner to set the HP ink cartridges installed in their printer so that the cartridges will only work in that printer. If someone tries to use your Protected Cartridge in another printer, cartridge will be blocked and they will be told it can only be used in the original printer. Enable HP Cartridge Protection. (All current and future installed HP Cartridges will be permanently protected and will only work in this printer). Disable HP Cartridge Protection. (Future Cartridges will not be protected. Previously Protected cartridges will remain protected). Save Settings Ensure the “blue tape” has been removed from the print head. Remove the cartridge from the printer, power off and remove power cord and printer cable, wait 2 to 3 minutes and restart printer after connecting cables. If the above fails there is probably a circuit problem and the cartridge needs to be replaced. First run the printer’s cleaning cycle approximately 3 to 4 times. Remove the cartridge from printer, lightly wet a folded sheet of paper towel, and hold cartridge nozzle area against paper for about 5 seconds, there should be a “foot print” of the colour/black. If very faded or missing colours place nozzles onto the paper again for about 3 to 5 min to get the ink flowing. Reinstall the cartridge in the printer after ensuring that the contacts are dry. Do a cleaning cycle again. Check print mode setting, must be normal for optimal quality documents, best for photo. All JetPrint cartridges are remanufactured therefore a message will pop up on your screen to tell you one of the following: INK CARTRIDGE MISSING – Remove cartridge, ensure blue tape has been removed, reinsert the cartridge, if that does not solve the problem it is probably a circuit fault. REFILLED OR DEPLETED CARTRIDGE DETECTED – press ok to continue. NEED INK – Always say “No thank you” USED OR COUNTERFEIT CARTRIDGES INSTALLED – press OK PRINTER WARRANTEE DOES NOT COVER..........NON HP.... Press OK to continue NON HP INSTALLED – press ok REMEMBER: all remanufactured cartridges will NOT reflect the correct ink level. It will show the level that it was when removed from the printer after the first cycle. The ink level cannot be corrected to show full – so if you see a message that tells you the cartridge is empty, continue printing until your printed page starts to show faded prints – it is now empty. On all Ink Tanks that are “chipped” you will probably get a message that you have installed a “Non HP Product” – That is because the chip has been replaced and to prevent any IP issues it will not reflect as an original HP product. – Press OK to continue. HP178, 920 style cartridges ensure the cartridge is “clicked” into place (you will hear it click) otherwise the chip will not read – CARTRIDGE MISSING Message. Remove and replace correctly. The short answer to that question is, YES IT CAN. Ink is water based with additives that help the ink to dry on the page. Once the cartridge is installed in the printer the ink will be exposed to evaporation through the nozzles (where the ink exits to print on the paper) and through breather holes on the lid, plus on the newer cartridges the plastic body itself also allows evaporation since recycled plastic is now being used to save our planet. What can be done to avoid this problem? Royce Imaging, as a quality conscience remanufacturer has taken some steps to lessen the effect of evaporation while the cartridge is still in its packaging. You will see that our packaging has changed recently and now incorporates an anti-static bag which is also vapour proof. This is a two fold solution: It protects the circuitry from Static shock which can make a cartridge fail in the printer The bag also prevents evaporation of ink. What can I as the user do? FIRSTLY; only open the packaging when you need to replace the empty cartridge. SECONDLY; once you have installed a new JetPrint cartridge make sure you print at least one page a week of black and colour to ensure that the nozzles do not dry out and to avoid those unwanted white lines through the text you printed. Yes this does use a bit of ink but in the long run you avoid the cartridge drying out and not working when you really need it to. PROBLEM! My printer stops printing at some stage after installing – why? The reason for this is that the Ink Monitor that measures the ink used has now reached empty. On all Remanufactured cartridges that have a print head (not ink tanks that have a replaceable chip) the Ink Monitor can’t be reset to full. SOLUTION! The following message will display on your computer screen: USED OR COUNTERFEIT CARTRIDGE DETECTED (Please don’t panic!) The original HP ink in this cartridge has been depleted. Was this cartridge sold to you as a new, genuine HP Branded cartridge that has not been previously used? YES NO TICK THE NO BOX The next message will display on your computer screen: USED, REFILLED OR COUNTERFEIT CARTRIDGE DETECTED The original HP ink in this cartridge has been depleted. WARNING:.................................................................... ........................................................................................ MISSED REWARDS To continue using this cartridge click OK OK SHOP ON LINE CLICK OK...NOT CANCEL PRINT! You will now be able to continue printing. CANCEL PRINT REFILLED: Just as the word says, the ink cartridge is simply injected with more ink using a syringe or in other words it is simply topped-up. Depending on who does the “refilling” there are varying degrees of executing the process. If the user themselves injects the ink it would probably be that the cartridge has not dried out yet so the user simply “adds” ink as one would add petrol to a car before it runs out and stops. This can work as long as the cartridge has not partly dried out. There are also “refill shops” where you take your cartridge, they will do a basic clean and then fill the cartridge. Many of them also use the syringe method, the more advanced will use a machine to fill with. REMANUFACTURED: Royce Imaging Industries has invested in up to date technology and processes to enable us to manufacture a high quality Ink Cartridge. INSPECTION AND TESTING: Every cartridge received by us undergoes a strict visual inspection and electronic test of the circuitry. CARTRIDGE PREPARATION AND CLEANING: The nozzles are rehydrated by soaking the in a specialised cleaning fluid and then the nozzles will be cleaned using an “atomised” steam system which delivers very small droplets under pressure. This process removes any dried ink that may block the tiny nozzle ports. The next stage of cleaning involves “over flushing” which flushes out any residual ink deposits inside the cartridge. The final stage of the process is to “centrifuge” the cartridge to remove all the liquid and get the ink sponge dry enough to accept the full amount of ink. CARTRIDGE FILLING: To ensure a high quality of print the first requirement is to use the best quality aftermarket ink available. This will ensure continuous good quality printing until the cartridge is depleted of ink. To this end we have sourced quality German ink that is comparable to the OEM. The next requirement is to fill all sponge filled cartridges under vacuum; utilising computer controlled dispensing that measures the precise amount of ink. To ensure accuracy each cartridge is weighed after filling to check that it meets the specified ink volume. CARTRIDGE TESTING: Each and every cartridge is print tested, firstly by checking the circuit integrity and then by actually printing 2 to 3 Test Pages on the compatable printer to check that the cartridge is clear of any defects. If the cartridge passes the stringent test procedure it is re-weighed to ensure it is still within the specified weight. The nozzle plate of the cartridge is cleaned and low tack tape is applied to the nozzles followed by fitting a transport clip. This is done to prevent the nozzles from drying out. CARTRIDGE PACKING: Finally the cartridge body is cleaned, labels attached and cartridge is put into an electro static bag to protect the circuitry from static shock which could kill the cartridge. This is then packed into blister packaging and labelled ready for sale.
POOR PRINT QUALITY (light print or lines)
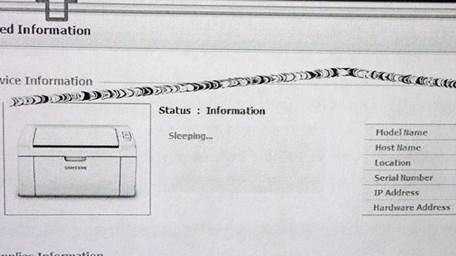
WARNING MESSAGE:
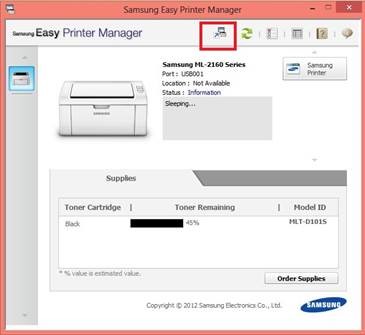
There are many reasons why you would need to download printer firmware and one of the main reason is to get your printer functions running faster and smoother, also after sometime your firmware becomes outdated and there is possibility that your cartridges stop working. Below is an easy run down on how to download updated firmware for your printer: Now, to download the most current firmware you will need to: Please follow the below steps to reset the toner sensor. 1. Open the front cover and leave open while completing the following steps. 2. Turn the printer off. 3. Hold the ‘go’ button while turning the printer on. All lights should be on. 4. Release the ‘go’ button (or “start’ button). 5. Press the ‘go’ button (or “start’ button) 2 times. 6. Wait. All panel lights should be on. 7. Press the ‘go’ button (or “start’ button) 5 times. The toner light should be off. (error may be flashing) The paper light should be on or flashing. 8. Close cover. The ready light should be the only light on. Solution 1: resetting the cartridge. Open front cover Press and release “CLEAR” button Message “Reset drum” appears on display with options 1 (Yes) or 2 (No). Enter following combination: *12 on display appears “accepted” Close cover and problem is solved. Solution 2: This is a standard procedure to be enabled on Brother USA site Problem: Replace toner message and your brother printer has stopped printing Solution: Enable continuous mode What is Brother MFC continuous mode? The print life of Brother toner cartridges is based upon their ability to continue to achieve guaranteed print quality. As the toner cartridge is used, the supply of available toner is consumed and the functional components become physically worn. The LED indication to replace toner cartridge flashes when the supply of toner and/or material deterioration reach a level at which the print quality can no longer be guaranteed. You can continue printing with the toner cartridge beyond its estimated print life by enabling “Continue Mode”. How to enable Continuous Mode? Press the GO button 7 times (quickly). All of the LEDs should flash twice, and the Ready LED should turn on. Continue mode is now enabled. To disable Continue Mode, please follow the steps below: Press the GO button 7 times (quickly). All of the LEDs should flash once. Continue mode is now disabled. Click here to download flyer Alignment is recommended when installing a cartridge to give you the best quality prints; this applies both to OEM and remanufactured cartridges. The newer Deskjet All-in-one with a scanner consists of a two stage process. The first step prints an alignment page.The second step requires that the alignment page be placed on the glass and then press the copy button. The machine reads the printed page and sets the alignment. The start button will flash during this process until complete. Failing to do the second stage will result in you continuously getting a pop up message asking to do an alignment which will interfere with printing. If you’ve ever had to print an important document in a hurry, you’ll know how frustrating it is when you’ve got strange streaks across the page. Most people think that this is a problem with their toner cartridges but often it is the printer that needs to be adjusted. High altitudes don’t just affect people. Often printers and other office equipment will misbehave at higher altitudes. This is especially true of Samsung toner printers using Samsung 101S black toner cartridges which will often print streaks like this if the altitude has not been set correctly: Luckily, there is an easy way to fix the altitude settings on your printer. Our technical support team have put together a step by step guide to help you get back to printing properly. To adjust the altitude settings for your Samsung 101S toner cartridge, please follow these steps: 1. You will need to install Samsung Easy Printer Manager. This programme should be on the disk you got with your printer. If you do not have the installation disk, you can download Samsung Easy Printer Manager. 2. Open Samsung Easy Printer Manger, select your printer from the printer list on the side. Click on the ‘Advanced Mode’ icon to access the altitude settings: This will open up the Machine Setup menu. 4. In the Machine Setup menu, go to Altitude Adjustment and select your altitude above sea level. If you’re not sure, select High 3: You can use this list as a rough guide to your settings depending on your height above sea level: 5. Click Save and then Click OK: Your settings will be saved and your printer will no longer print the odd streaks across your page.
How To Adjust the Altitude Settings for your Samsung MLT-D101S Toner Cartridge
3. Select Device settings: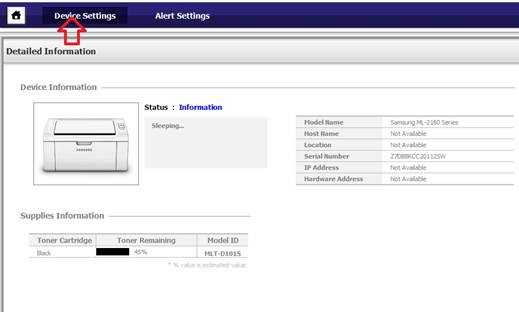
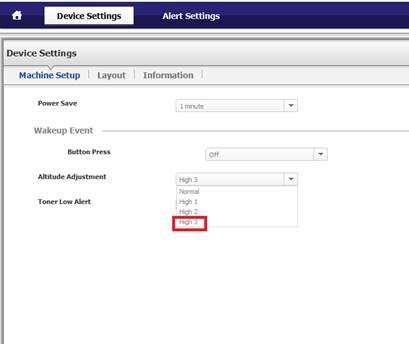
Normal – 0 to 1000m
High 1 – 1000m to 2000m
High 2 – 2000m to 3000m
High 3 – 3000m to 4000m